说明
Velero(以前称为 Heptio Ark)可以提供备份和还原 Kubernetes 集群资源和持久卷的能力,你可以在公有云或本地搭建的私有云环境安装 Velero,可以为你提供以下能力:
- 备份集群数据,并在集群故障的情况下进行还原
- 将集群资源迁移到其他集群
- 将生产集群复制到开发和测试集群
Velero 包含一个在集群上运行的服务器端和在本地运行的命令行客户端。
原理
每个Velero的操作(比如按需备份、计划备份、还原)都是CRD自定义资源,Velero可以备份或还原集群中的所有对象,也可以按类型、namespace或标签过滤对象。Velero是kubernetes用来灾难恢复的理想选择,也可以在集群上执行系统操作(比如升级)之前对应用程序状态进行快照的理想选择。
按需备份
需要注意的是集群备份并不是严格的原子备份,如果在备份时创建或编辑kubernetes对象,则他们可能不会被包含在备份中,是可能出现这种情况的。
按需备份操作可以将复制的kubernetes对象的压缩文件上传到云对象存储中,也可以调用云环境提供的
API来创建持久化卷的磁盘快照。我们可以选择指定在备份期间执行的备份hook,比如你可能需要在拍摄快照之前告诉数据库将其内存中的缓冲区刷新到磁盘。
定时备份
通过定时操作,我们可以定时备份数据,第一次创建日程表时将执行第一次备份,随后的备份将按日程表指定的间隔进行备份,这些间隔由Cron表达式指定。
定时备份保存的名称为<SCHEDULE NAME>-<TIMESTAMP>,其中 <TIMESTAMP> 格式为 YYYYMMDDhhmmss。
备份还原
通过还原操作,我们可以从以前创建的备份中还原所有对象和持久卷,此外我们还可以仅还原对象和持久卷的子集,Velero支持多个命名空间重新映射。例如在一次还原操作中,可以在命名空间def下创建命名空间abc中的对象,或在456下重新创建命名空间为123中的对象。
还原的默认名称为<BACKUP NAME>-<TIMESTAMP>,<TIMESTAMP> 格式为 YYYYMMDDhhmmss,还可以指定自定义名称,恢复的对象还包括带有键 velero.io/restore-name 和值的标签 <RESTORE NAME>。
默认情况下,备份存储位置以读写模式创建,但是在还原期间,可以将备份存储位置配置为只读模式,这将禁用该存储位置的备份创建和删除,这对于确保在还原方案间不会无意间创建或删除任何备份非常有用。此外我们还可以选择指定在还原期间或还原资源执行的还原hook,例如可能需要在数据库应用程序容器启动之前执行自定义数据库还原操作。
备份流程
执行命令velero backup create test-backup的时候,会执行下面的操作:
- Verlero客户端调用kubernetes APIServer创建Backup这个CRD对象
- Backup控制器watch到新的Backup对象被创建并执行验证
- Backup控制器开始执行备份,通过查询APIServer来获取资源收集数据进行备份
- Backup控制器调用对象存储服务,比如S3上传备份文件
默认情况下velero backup create支持任何持久卷的磁盘快照,可以通过指定其他参数来调整快照,可以使用--snapshot-volumes=false选项禁用快照。

备份的API版本
Velero使用kubernetes APIServer的首选版本为group/resource备份资源,还原资源时,目标集群中必须存在相同的API group/vesion,以便还原成功。
例如,如果集群正在备份things API组下的gizmos资源,该资源包括things/v1alpha1、things/v1beta1以及things/v1三个版本,并且服务器的首选本为things/v1,那么gizmos的备份数据将从things/v1 API端点获取,从该集群还原备份时,目标集群必须具有things/v1端点才能将gizmos的备份数据还原。
设置备份过期时间
创建备份时,可以通过添加标志–ttl来指定TTL,如果未指定,则将默认的TTL值为30天,如果Velero检测到备份资源已过期,它将删除以下相应备份数据:
- 备份资源
- 来自云对象存储的备份文件
- 所有PersistentVolume快照
- 所有关联的还原
同步对象存储
Velero将对象存储视为资源的来源,它不断检查以确保始终存在正确的备份资源,如果存储通中有格式正确的备份文件,但kubernetes APIServer中没有相应的备份资源,则Velero会将信息从对象存储同步到kubernetes,这使还原功能在集群迁移方案中工作,在该方案中,新集群中不存在原始的备份对象。同样,如果备份对象存在于kubernetes中,但不存在于对象存储中,则由于备份压缩包不再存在,它将从kubernetes删除。
备份存储位置和卷快照位置
Velero有两个自定义资源BackupStorageLocation和 VolumeSnapshotLocation,用于配置Velero备份及其关联的持久卷快照的存储位置。
BackupStorageLocation:定义为存储区,存储所有Velero数据在存储区中的前缀以及一组其他特定于提供程序的字段,后面部分会详细介绍该部分所包含的字段。VolumeSnapshotLocation:完全由提供程序提供的特定的字段(例如AWS区域,Azure资源组,Portworx快照类型等)定义。
用户可以预先配置一个或多个可能的BackupStorageLocations 对象,也可以预先配置一个或多个VolumesSnapshotLocation对象,并且可以在创建备份时选择应该存储备份和相关快照的位置。
此配置设计支持许多不同的用法,包括:
- 在单个Velero备份中创建不止一种持久卷的快照。例如,在同时具有EBS卷和Portworx卷的集群中
- 在不同地区将数据备份到不同的存储中
- 对于支持它的卷提供程序(例如Portworx),可以将一些快照存储在本地集群中,而将其他快照存储在云中
安装
在 Github Release 页面下载指定的 velero 二进制客户端安装包,这里下载最新稳定版本1.9.3
 1
 2
 3
 4
 5
 6
 7
 8
 9
10
|
wget https://github.com/vmware-tanzu/velero/releases/download/v1.9.3/velero-v1.9.3-linux-amd64.tar.gz
tar -zxvf velero-v1.9.3-linux-amd64.tar.gz
cd velero-v1.9.3-linux-amd64/
cp velero /usr/local/bin/
velero version
Client:
Version: v1.9.3
Git commit: 9a617fe5af9c997d69f8f37a5b40d0462edd9b28
<error getting server version: no matches for kind "ServerStatusRequest" in version "velero.io/v1">
|
安装minio
安装minio这里不做赘述。上面解压的的压缩包中包含了一个examples/minio/00-minio-deployment.yaml的资源清单文件,可以用测试。也可以单独搭建minio
安装velero服务端
我们可以使用Velero客户端来安装服务端,也可以使用helm chart来进行安装,比如这里我们用客户端来安装,Velero命令默认读取kubectl配置的集群上下文,所以前提是velero客户端所在节点有可访问集群的kubeconfig配置。
首先准备密钥文件,在当前目录建立一个文本文件,写入以下内容,其中和,分别对应minio的账号密码
1
2
3
4
|
vim  credentials-velero
[default]
aws_access_key_id=<access key id>
aws_secret_access_key=<secret access key>
|
安装服务端
 1
 2
 3
 4
 5
 6
 7
 8
 9
10
11
12
13
14
15
16
17
18
19
20
21
22
23
|
#记得提前在minio创建名为velero的bucket
velero install \
--provider aws \
--bucket velero \
--image velero/velero:v1.9.3 \
--plugins velero/velero-plugin-for-aws:v1.4.1 \
--namespace velero \
--secret-file ./credentials-velero \
--use-volume-snapshots=false \
--use-restic \
--backup-location-config region=minio,s3ForcePathStyle="true",s3Url=http://172.16.77.95:9000
......
DaemonSet/restic: attempting to create resource
DaemonSet/restic: attempting to create resource client
DaemonSet/restic: created
Velero is installed! ⛵ Use 'kubectl logs deployment/velero -n velero' to view the status.
kubectl get pods -n velero
NAME READY STATUS RESTARTS AGE
restic-5lzr4 1/1 Running 0 53s
velero-578458fb6-2vrcp 1/1 Running 0 53s
|
由于这里准备使用minio来作为对象存储,minio是兼容S3的,所以这里我们配置的provider(声明使用的velero插件类型)是aws,--secret-file用来提供访问minio的密钥,--use-restic表示使用开源免费备份工具restic备份和还原持久卷数据,启动该参数后会部署一个名为restic的DaemonSet对象,--plugins使用的velero插件,我们使用AWS S3兼容插件。
测试
这里部署一个mysql应用用做测试,资源清单文件如下所示:
 1
 2
 3
 4
 5
 6
 7
 8
 9
10
11
12
13
14
15
16
17
18
19
20
21
22
23
24
25
26
27
28
29
30
31
32
33
34
35
36
37
38
39
40
41
42
43
44
45
46
47
48
49
50
51
52
53
54
55
56
57
58
59
60
61
62
63
64
65
|
#mysql-deployment.yaml
apiVersion: v1
kind: PersistentVolumeClaim
metadata:
name: mysql-pv-claim
labels:
app: mysql
spec:
accessModes:
- ReadWriteOnce
resources:
requests:
storage: 20Gi
---
apiVersion: apps/v1
kind: Deployment
metadata:
name: mysql
labels:
app: mysql
spec:
selector:
matchLabels:
app: mysql
template:
metadata:
labels:
app: mysql
spec:
containers:
- image: mysql:5.6
name: mysql
env:
- name: MYSQL_ROOT_PASSWORD
value: "123456"
livenessProbe:
tcpSocket:
port: 3306
ports:
- containerPort: 3306
name: mysql
volumeMounts:
- name: mysql-persistent-storage
mountPath: /var/lib/mysql
volumes:
- name: mysql-persistent-storage
persistentVolumeClaim:
claimName: mysql-pv-claim
---
apiVersion: v1
kind: Service
metadata:
labels:
app: mysql
name: mysql-nodeport
spec:
ports:
- name: mysql
nodePort: 33306
port: 3306
targetPort: mysql
selector:
app: mysql
type: NodePort
|
直接部署应用
1
2
3
4
5
6
|
kubectl create ns demo
kubectl apply -f mysql-deployment.yaml -n demo
kubectl get pods -n demo
NAME READY STATUS RESTARTS AGE
mysql-6f5794fd54-z6mr5 1/1 Running 0 49s
|
这里我创建了一个新的数据库velero和导入了一个数据库task:
 1
 2
 3
 4
 5
 6
 7
 8
 9
10
11
12
13
14
15
16
17
18
19
20
21
22
23
24
25
26
27
28
29
|
kubectl exec -it -n demo mysql-6f5794fd54-z6mr5 /bin/bash
kubectl exec [POD] [COMMAND] is DEPRECATED and will be removed in a future version. Use kubectl exec [POD] -- [COMMAND] instead.
root@mysql-6f5794fd54-z6mr5:/# mysql -uroot -p
Enter password:
Welcome to the MySQL monitor. Commands end with ; or \g.
Your MySQL connection id is 8392
Server version: 5.6.51 MySQL Community Server (GPL)
Copyright (c) 2000, 2021, Oracle and/or its affiliates. All rights reserved.
Oracle is a registered trademark of Oracle Corporation and/or its
affiliates. Other names may be trademarks of their respective
owners.
Type 'help;' or '\h' for help. Type '\c' to clear the current input statement.
mysql> show databases;
+--------------------+
| Database |
+--------------------+
| information_schema |
| mysql |
| performance_schema |
| task |
| velero |
+--------------------+
5 rows in set (0.00 sec)
mysql>
|
现在来执行一个备份
1
2
3
|
velero backup create mysql-backup --include-namespaces demo --default-volumes-to-restic
Backup request "mysql-backup" submitted successfully.
Run `velero backup describe mysql-backup` or `velero backup logs mysql-backup` for more details.
|
其中我们指定的--default-volumes-to-restic参数表示使用restic备份持久卷到minio,--include-namespaces用来指定备份该命名空间下的所有资源,不包括集群资源,此外还可以使用--include--resources指定要备份的资源类型,--include-cluster-resources指定是否备份集群资源。
该命令请求创建一个对项目(命名空间)的备份,备份请求发送之后可以用命令查看备份状态,等到STATUS列表为Completed表示备份完成。
 1
 2
 3
 4
 5
 6
 7
 8
 9
10
11
12
13
14
15
16
17
18
19
20
21
22
23
24
25
26
27
28
29
30
31
32
33
34
35
36
37
38
39
40
41
42
43
44
45
46
47
48
49
50
51
52
53
54
55
|
velero backup get
NAME STATUS ERRORS WARNINGS CREATED EXPIRES STORAGE LOCATION SELECTOR
mysql-backup Completed 0 0 2022-11-17 10:19:11 +0800 CST 29d default <none>
velero backup describe mysql-backup
Name: mysql-backup
Namespace: velero
Labels: velero.io/storage-location=default
Annotations: velero.io/source-cluster-k8s-gitversion=v1.20.6
velero.io/source-cluster-k8s-major-version=1
velero.io/source-cluster-k8s-minor-version=20
Phase: Completed
Errors: 0
Warnings: 0
Namespaces:
Included: demo
Excluded: <none>
Resources:
Included: *
Excluded: <none>
Cluster-scoped: auto
Label selector: <none>
Storage Location: default
Velero-Native Snapshot PVs: auto
TTL: 720h0m0s
Hooks: <none>
Backup Format Version: 1.1.0
Started: 2022-11-17 10:19:11 +0800 CST
Completed: 2022-11-17 10:19:40 +0800 CST
Expiration: 2022-12-17 10:19:11 +0800 CST
Total items to be backed up: 14
Items backed up: 14
Velero-Native Snapshots: <none included>
Restic Backups (specify --details for more information):
Completed: 1
|
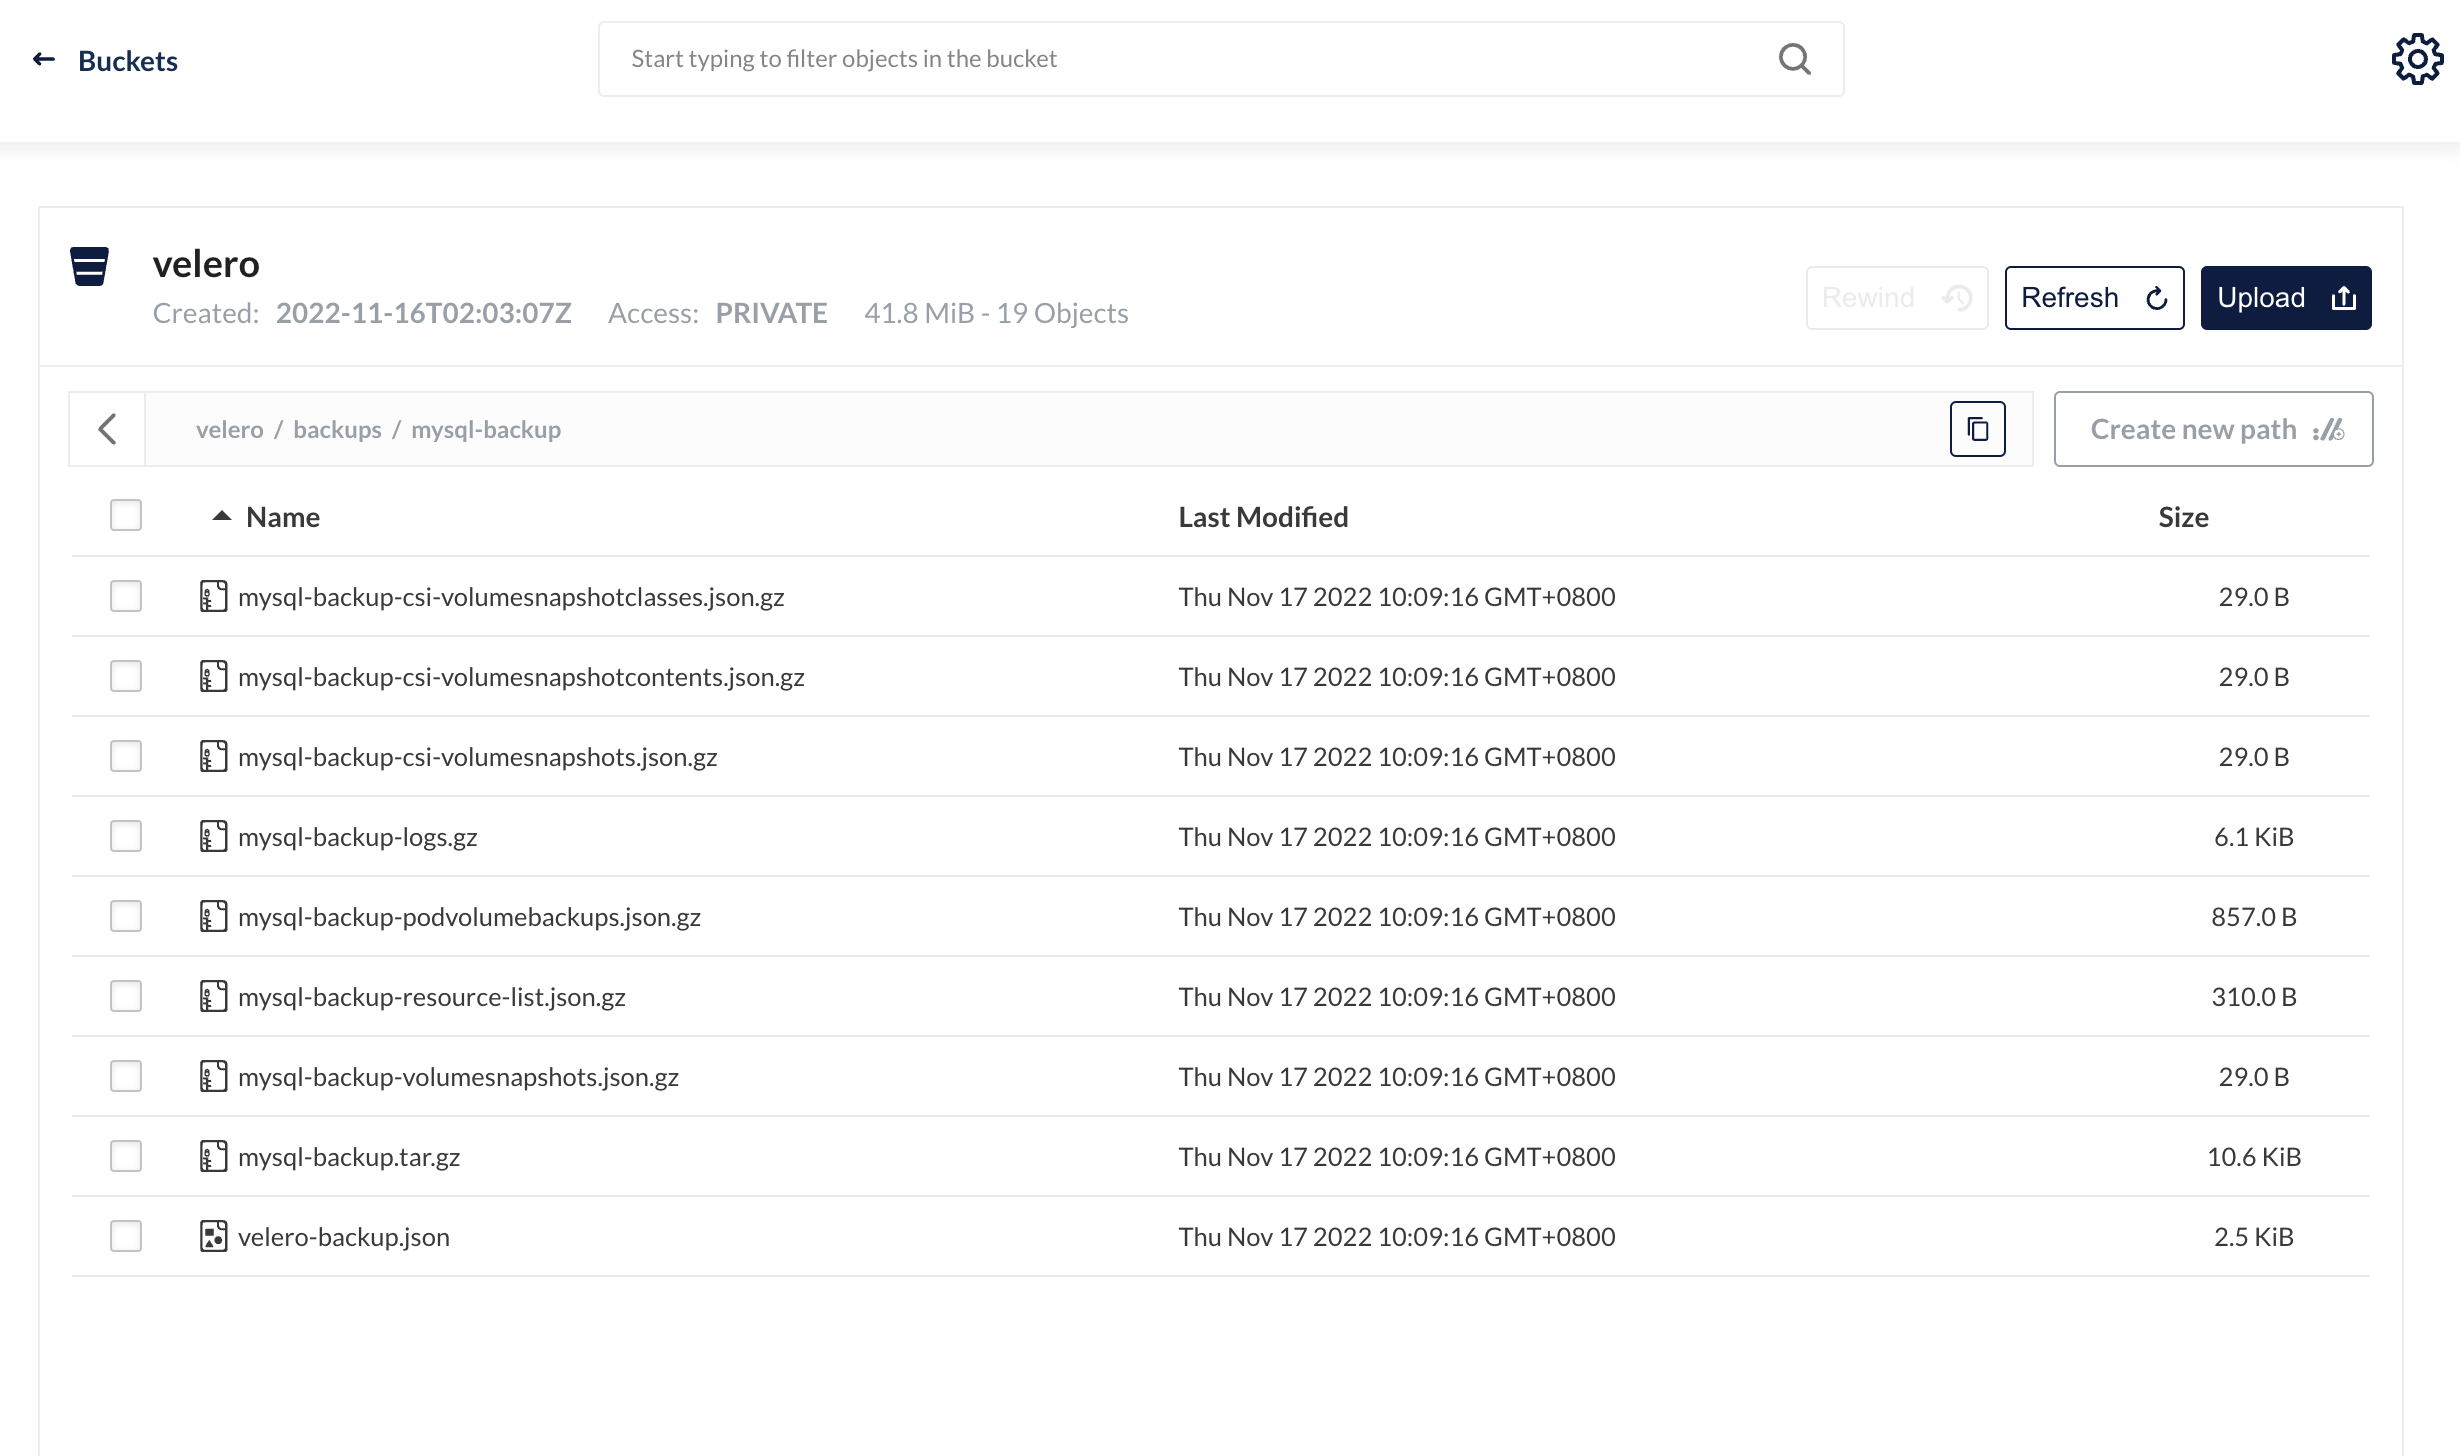
备份完成后可以去minio的对应buchet上查看是否有备份数据:
 现在删除应用所在的命名空间来模拟生产环境发生灾难或运维错误导致的应用失败的场景:
1
2
3
4
|
kubectl delete ns demo
kubectl get ns demo
Error from server (NotFound): namespaces "demo" not found
|
可以看到命名空间已删除,这时候可能是访问不了我们的mysql了,现在使用velero从minio中来恢复应用和数据:
1
2
3
4
|
velero restore create --from-backup mysql-backup
Restore request "mysql-backup-20221117103330" submitted successfully.
Run `velero restore describe mysql-backup-20221117103330` or `velero restore logs mysql-backup-20221117103330` for more details.
|
同样也可以使用velero restore get来查看还原的进度,等到STATUS列表为Completed表示还原完成:
 1
 2
 3
 4
 5
 6
 7
 8
 9
10
11
12
13
14
15
16
17
18
19
20
21
22
23
24
25
26
27
28
29
30
31
32
33
34
35
36
37
38
39
40
41
42
43
44
45
|
velero restore get
NAME BACKUP STATUS STARTED COMPLETED ERRORS WARNINGS CREATED SELECTOR
mysql-backup-20221117103330 mysql-backup Completed 2022-11-17 10:33:30 +0800 CST 2022-11-17 10:33:36 +0800 CST 0 0 2022-11-17 10:33:30 +0800 CST <none>
velero restore describe mysql-backup-20221117103330
Name: mysql-backup-20221117103330
Namespace: velero
Labels: <none>
Annotations: <none>
Phase: Completed
Total items to be restored: 14
Items restored: 14
Started: 2022-11-17 10:33:30 +0800 CST
Completed: 2022-11-17 10:33:36 +0800 CST
Backup: mysql-backup
Namespaces:
Included: all namespaces found in the backup
Excluded: <none>
Resources:
Included: *
Excluded: nodes, events, events.events.k8s.io, backups.velero.io, restores.velero.io, resticrepositories.velero.io, csinodes.storage.k8s.io, volumeattachments.storage.k8s.io
Cluster-scoped: auto
Namespace mappings: <none>
Label selector: <none>
Restore PVs: auto
Restic Restores (specify --details for more information):
Completed: 1
Existing Resource Policy: <none>
Preserve Service NodePorts: auto
|
还原完成后我们再去查看demo命名空间的应用数据是否正确:
 1
 2
 3
 4
 5
 6
 7
 8
 9
10
11
12
13
14
15
16
17
18
19
20
21
22
23
24
25
26
27
28
29
30
31
32
33
34
35
36
37
38
|
kubectl get pods -n demo
NAME READY STATUS RESTARTS AGE
mysql-6f5794fd54-z6mr5 1/1 Running 0 4m4s
kubectl exec -it -n demo mysql-6f5794fd54-z6mr5 /bin/bash
kubectl exec [POD] [COMMAND] is DEPRECATED and will be removed in a future version. Use kubectl exec [POD] -- [COMMAND] instead.
root@mysql-6f5794fd54-z6mr5:/# mysql -uroot -p
Enter password:
Welcome to the MySQL monitor. Commands end with ; or \g.
Your MySQL connection id is 31
Server version: 5.6.51 MySQL Community Server (GPL)
Copyright (c) 2000, 2021, Oracle and/or its affiliates. All rights reserved.
Oracle is a registered trademark of Oracle Corporation and/or its
affiliates. Other names may be trademarks of their respective
owners.
Type 'help;' or '\h' for help. Type '\c' to clear the current input statement.
mysql> show databases;
+--------------------+
| Database |
+--------------------+
| information_schema |
| mysql |
| performance_schema |
| task |
| velero |
+--------------------+
5 rows in set (0.01 sec)
mysql>
|
可以看到我们创建的velero、task数据库依然存在,证明已经全部恢复了
只要我们将每个velero实例指向相同的对象存储,velero就能将资源从一个集群迁移到另一个集群。此外还支持定时备份,触发备份Hooks等操作。
 支付宝
支付宝
 微信
微信