简单记录一下安装elasticsearch过程
环境:Centos7.6、elasticsearch7.9.0
二进制安装
在官网下载elasticsearch
https://www.elastic.co/cn/downloads/elasticsearch
我使用的版本为:
https://artifacts.elastic.co/downloads/elasticsearch/elasticsearch-7.9.0-linux-x86_64.tar.gz
下载elasticsearch
1
2
|
$ wget https://artifacts.elastic.co/downloads/elasticsearch/elasticsearch-7.9.0-linux-x86_64.tar.gz
$ tar -zxvf elasticsearch-7.9.0-linux-x86_64.tar.gz -C /usr/local/
|
配置
创建data目录
1
2
|
$ cd /usr/local/elasticsearch-7.9.0/
$ mkdir data
|
修改配置文件elasticearch.yml
 1
 2
 3
 4
 5
 6
 7
 8
 9
10
11
12
13
14
15
16
17
|
$ vim /usr/local/elasticsearch-7.9.0/config/elasticsearch.yml
### 加入以下内容

#设置集群名称
cluster.name: kute-elasticsearch
#设置节点名称
node.name: es-node1
#设置数据存储路径
path.data: /usr/local/elasticsearch-7.9.0/data
#设置日志存储路径
path.logs: /usr/local/elasticsearch-7.9.0/logs
# 允许其他机器访问
network.bind_host: 0.0.0.0
#设置绑定ip,设置为0.0.0.0外网都能访问
network.host: 172.16.77.26
#初始化主节点
cluster.initial_master_nodes: ["es-node1"]
|
如果需要调整jvm相关参数,就修改jvm.options配置文件
配置es用户
es不能用root用户启动,需要创建一个用户
1
2
|
$ useradd esuser   #添加用户
$ chown -R esuser:esuser /usr/local/elasticsearch-7.9.0/   #对该目录授权
|
启动es
1
2
|
$ su - esuser
$ /usr/local/elasticsearch-7.9.0/bin/elasticsearch
|
出现以下报错
1
2
3
|
ERROR: [1] bootstrap checks failed
[1]: max virtual memory areas vm.max_map_count [65530] is too low, increase to at least [262144]
ERROR: Elasticsearch did not exit normally - check the logs at /usr/local/elasticsearch-7.9.0/logs/imooc-elasticsearch.log
|
配置打开的最大文件数、最大线程数
 1
 2
 3
 4
 5
 6
 7
 8
 9
10
11
12
13
14
15
16
17
18
|
$ su - root

$ vim /etc/security/limits.conf
#加入以下内容
* soft nofile 65535
* hard nofile 131072
* soft nproc 2048
* hard nproc 4096


####修改sysctl.conf配置文件
$ vim /etc/sysctl.conf
#加入以下内容
vm.max_map_count=262145


###刷新配置文件
$ sysctl -p
|
重新启动
1
2
|
$ su - esuser
$ /usr/local/elasticsearch-7.9.0/bin/elasticsearch
|
测试
 1
 2
 3
 4
 5
 6
 7
 8
 9
10
11
12
13
14
15
16
17
18
|
$ curl 'http://localhost:9200/?pretty'
{
  "name" : "es-node1",
  "cluster_name" : "imooc-elasticsearch",
  "cluster_uuid" : "atFS8kRvRwSSzOktU-8KyA",
  "version" : {
    "number" : "7.9.0",
    "build_flavor" : "default",
    "build_type" : "tar",
    "build_hash" : "a479a2a7fce0389512d6a9361301708b92dff667",
    "build_date" : "2020-08-11T21:36:48.204330Z",
    "build_snapshot" : false,
    "lucene_version" : "8.6.0",
    "minimum_wire_compatibility_version" : "6.8.0",
    "minimum_index_compatibility_version" : "6.0.0-beta1"
  },
  "tagline" : "You Know, for Search"
}
|
后台运行
1
|
$ /usr/local/elasticsearch-7.9.0/bin/elasticsearch -d
|
配置es为系统服务
 1
 2
 3
 4
 5
 6
 7
 8
 9
10
11
12
13
14
15
16
17
18
19
20
21
22
23
24
25
26
27
28
29
30
31
32
33
34
35
36
37
|
$ vim /usr/lib/systemd/system/elasticsearch.service

###写入以下内容
[Unit]

Description=elasticsearch
Documentation=https://www.elastic.co
After=network.target

[Service]

Type=simple

User=esuser

Group=esuser

LimitNOFILE=100000

LimitNPROC=100000

Restart=no

ExecStart=/usr/local/elasticsearch-7.9.0/bin/elasticsearch

PrivateTmp=true

[Install]

WantedBy=multi-user.target


###以服务启动es
$ systemctl daemon-reload
$ systemctl enable elasticsearch.service
$ systemctl start elasticsearch.service
|
rpm安装
下载es7.9.0的rpm包和sha512校验和文件
1
2
3
4
5
6
7
|
$ wget  https://artifacts.elastic.co/downloads/elasticsearch/elasticsearch-7.9.0-x86_64.rpm

$ wget  https://artifacts.elastic.co/downloads/elasticsearch/elasticsearch-7.9.0-x86_64.rpm.sha512

###检查sha512校验和
$ sha512sum -c elasticsearch-7.9.0-x86_64.rpm.sha512
elasticsearch-7.9.0-x86_64.rpm: OK
|
安装es
 1
 2
 3
 4
 5
 6
 7
 8
 9
10
11
12
13
14
15
16
17
18
19
20
|
$ rpm -ivh elasticsearch-7.9.0-x86_64.rpm
warning: elasticsearch-7.9.0-x86_64.rpm: Header V4 RSA/SHA512 Signature, key ID d88e42b4: NOKEY
Preparing...                          ################################# [100%]
Creating elasticsearch group... OK
Creating elasticsearch user... OK
Updating / installing...
   1:elasticsearch-0:7.9.0-1          ################################# [100%]
### NOT starting on installation, please execute the following statements to configure elasticsearch service to start automatically using systemd
 sudo systemctl daemon-reload
 sudo systemctl enable elasticsearch.service
### You can start elasticsearch service by executing
 sudo systemctl start elasticsearch.service
Created elasticsearch keystore in /etc/elasticsearch/elasticsearch.keystore


###以服务方式启动Kibana
$ systemctl daemon-reload
$ systemctl enable elasticsearch.service
$ systemctl start elasticsearch.service
|
es目录说明及相关配置
ES7.x内置了jdk
程序目录为/usr/share/elasticsearch
配置目录为/etc/elasticsearch
pid目录为/var/run/elasticsearch
环境变量文件为/etc/sysconfig/elasticsearch
elasticsearch.yml中默认配置的数据目录和日志目录为:path.data: /var/lib/elasticsearch,path.logs: /var/log/elasticsearch
修改配置文件
 1
 2
 3
 4
 5
 6
 7
 8
 9
10
11
12
13
14
15
16
17
18
19
20
21
22
23
24
|
$ vim /etc/elasticsearch/elasticsearch.yml

### 改为以下内容

#设置集群名称
cluster.name: kute-elasticsearch
#设置节点名称
node.name: es-node1
###注意,如果修改数据、日志存储路径,一定要提前创建对应目录 并将权限赋予给elasticsearch用户和组
#设置数据存储路径
path.data: /var/lib/elasticsearch
#设置日志存储路径
path.logs: /var/log/elasticsearch
# 允许其他机器访问
network.bind_host: 0.0.0.0
#设置绑定ip,设置为0.0.0.0外网都能访问
network.host: 172.16.77.26
#初始化主节点
cluster.initial_master_nodes: ["es-node1"]


###然后重启elasticsearch
$ systemctl daemon-reload
$ systemctl restart elasticsearch.service
|
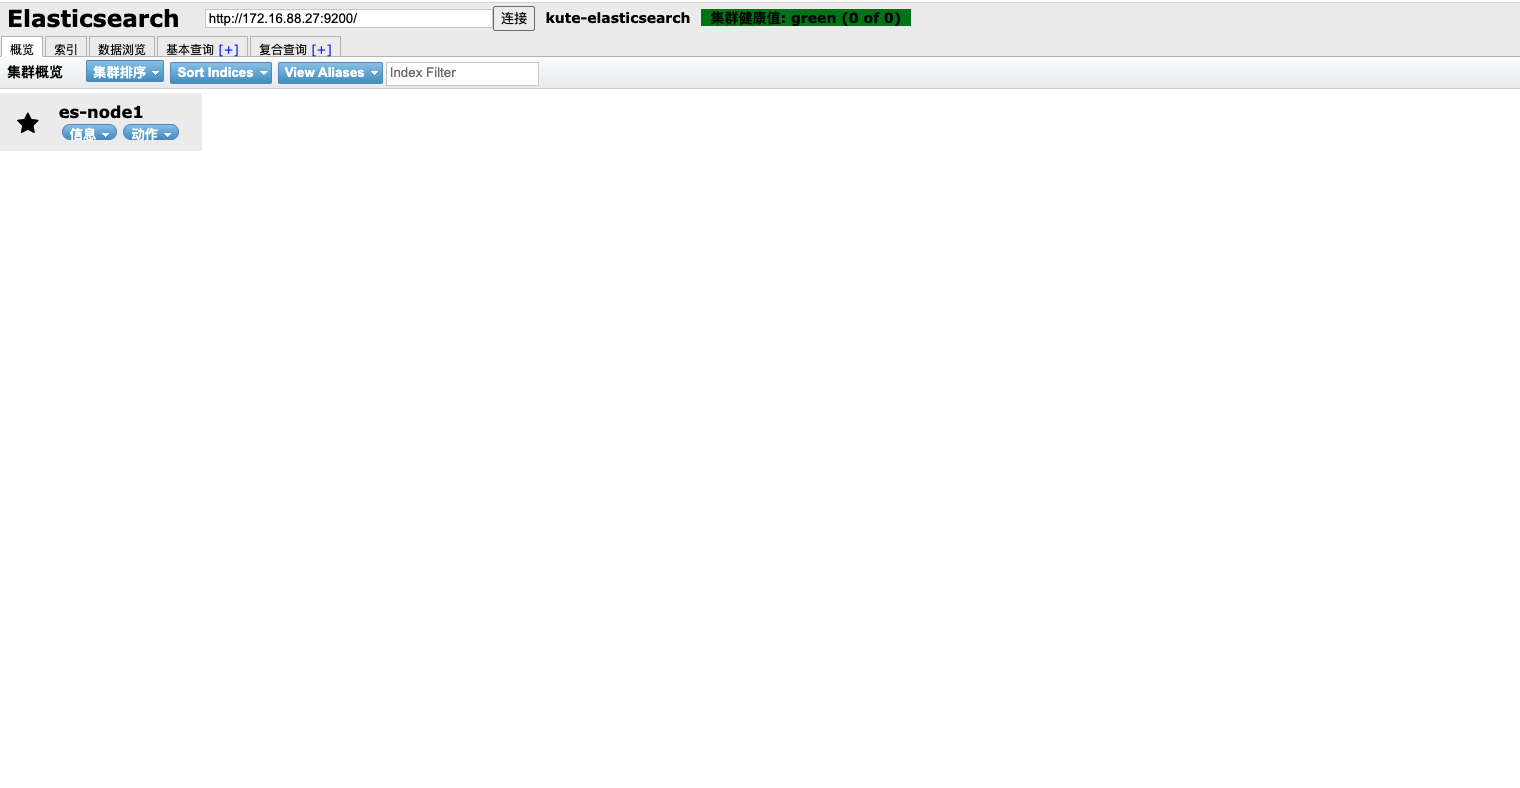
可视化插件ES-HEAD(可选)
注意:此开源项目貌似已经停止维护,生产上或高版本尽量避免使用
项目地址:https://github.com/mobz/elasticsearch-head.git
安装
github上已经给提供了安装方法
1
2
3
4
5
|
###这里做了一些修改
$ git clone https://github.com/mobz/elasticsearch-head.git
$ cd elasticsearch-head
$ npm install
$ npm run start
|
注意:现在启动会显示elasticsearch未连接
增加ES配置
 1
 2
 3
 4
 5
 6
 7
 8
 9
10
11
|
$ vim /usr/local/elasticsearch-7.9.0/config/elasticsearch.yml
###加入以下内容  然后重启ES
# 监听端口(默认)
http.port: 9200
# # 增加参数,使head插件可以访问es
http.cors.enabled: true
http.cors.allow-origin: "*"


###重启ES后再启动ES-HEAD
$ npm run start
|
访问
ES-HEAD的默认端口是9100,所以直接浏览器访问http://ip:9100即可
 支付宝
支付宝
 微信
微信